Facial Fifths Guide: How to Measure Eye Spacing and Face Width
A practical, photo-aware guide to facial fifths, eye spacing, face width, vertical fifths, and the limits of calling any layout ideal.
Quick answer
Facial fifths are a horizontal reference that divides the visible face width into five approximate sections. They are often used to discuss eye spacing, eye width, and face width, but the result is only as reliable as the photo, landmarks, and convention being used.
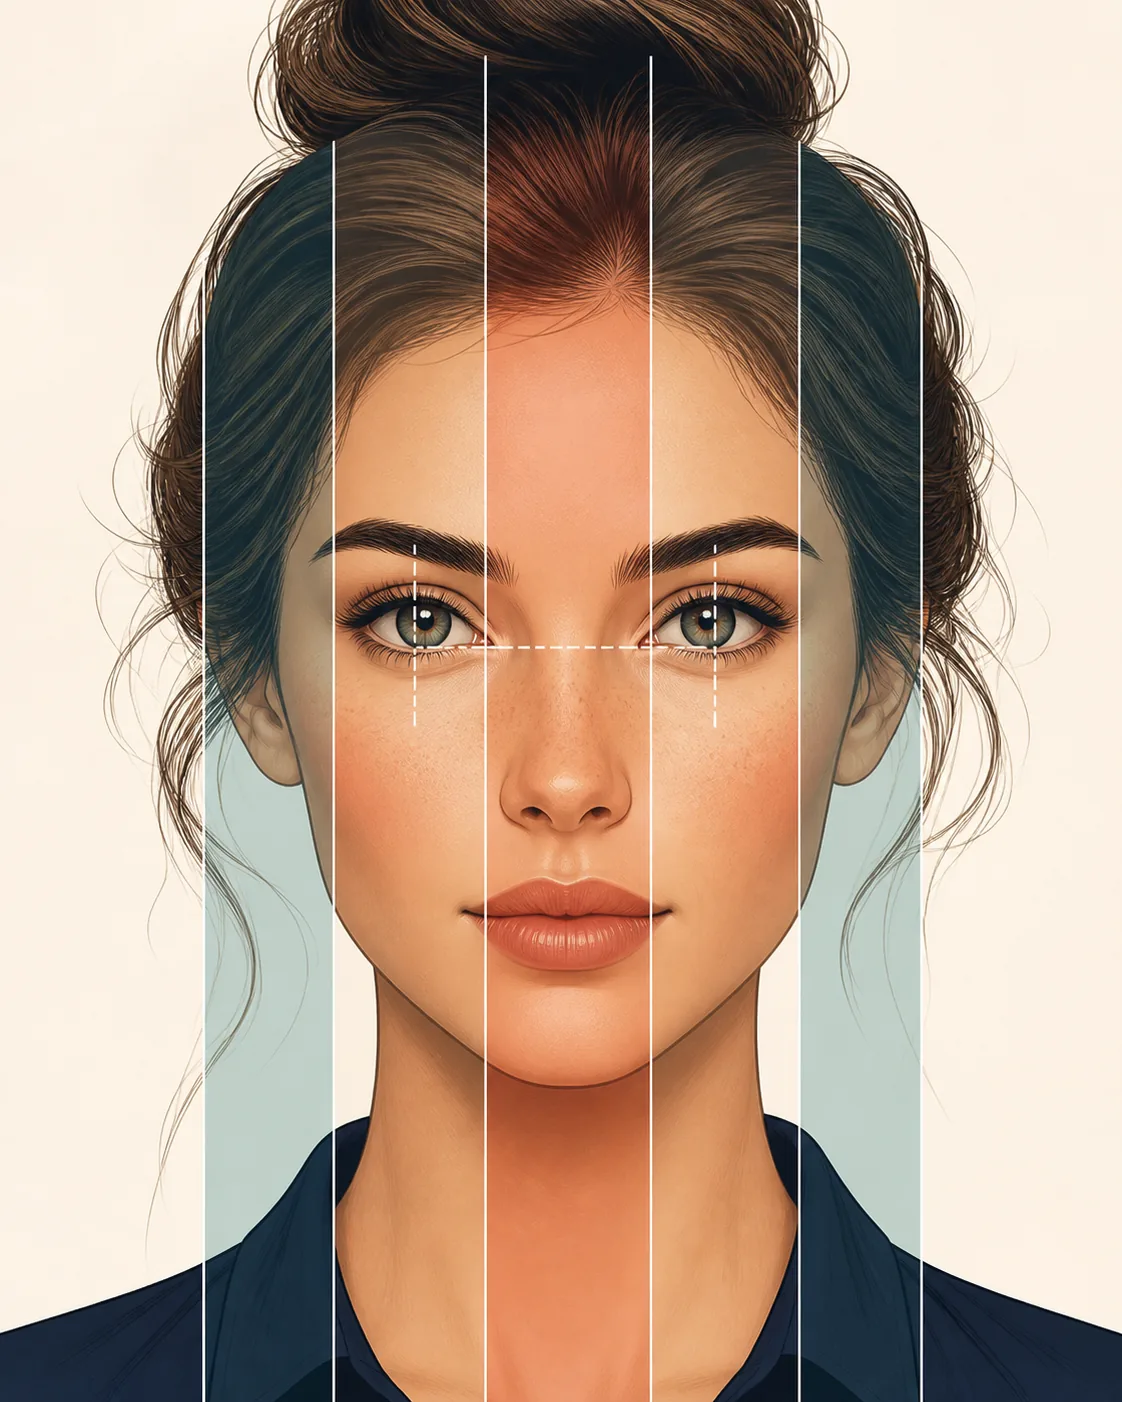
Searches for facial fifths usually come from a practical question: how can you compare eye spacing and face width without relying on a vague beauty label? The five-part reference gives the question a visual structure, but it does not turn a portrait into a fixed score.
In a typical explanation, the visible face width is divided into five approximate columns. The middle columns help describe the eyes, while the outer columns help describe the relationship between the eyes and the sides of the face. Different guides use slightly different landmarks, so the convention must be stated before a result is interpreted.
This guide shows how to calculate facial fifths from a photo, what to compare, and why a close selfie can make the same face look wider or more compressed. Use the framework to understand a picture, not to rank a person.
What Facial Fifths Mean
Facial fifths describe horizontal organization. Instead of dividing the face from forehead to chin, as facial thirds do, the fifths method looks from the left side of the face to the right side. It asks how the visible width is distributed around the eyes, nose, and outer facial contour.
The phrase facial vertical fifths can sound like a strict anatomical rule, but it is better understood as a comparison grid. The outer boundaries may use the widest cheek or temple points, while the inner guides may use eye corners, pupil lines, or eye-width references. That choice changes the result.
A useful report therefore names the landmarks and the image conditions. Saying that a photo has a wider outer section is more informative than saying that a person fails an ideal ratio.
Key idea
Facial fifths are a descriptive grid. They become useful when the same landmarks and photo setup are used for comparison.
| Section | What it can describe | What can change it |
|---|---|---|
| Outer left | Visible space from the left facial contour toward the left eye | Head turn, hair, crop, lens perspective |
| Left eye area | Left eye width and nearby spacing | Expression, eyelid position, landmark choice |
| Center | Nose bridge, inter-eye space, and central alignment | Camera distance, nose projection, gaze direction |
| Right eye area | Right eye width and nearby spacing | Expression, eyelid position, landmark choice |
| Outer right | Visible space from the right eye toward the right contour | Head turn, hair, crop, lens perspective |
How the Five Vertical Sections Work
A simple five-section workflow starts by finding the usable face width in a straight portrait. The guide lines should follow the face rather than the hair, background, or camera crop. When the head is turned, the near and far sides no longer represent equal visible distances, so a front-facing photo is easier to compare.
Many explanations place one eye-width-like unit around each eye and use the remaining columns to discuss outer width and the central gap. This is a visual convention, not a universal biological template. Eye shapes, brow position, eyelids, cheek volume, and face contour can all make the columns look different.
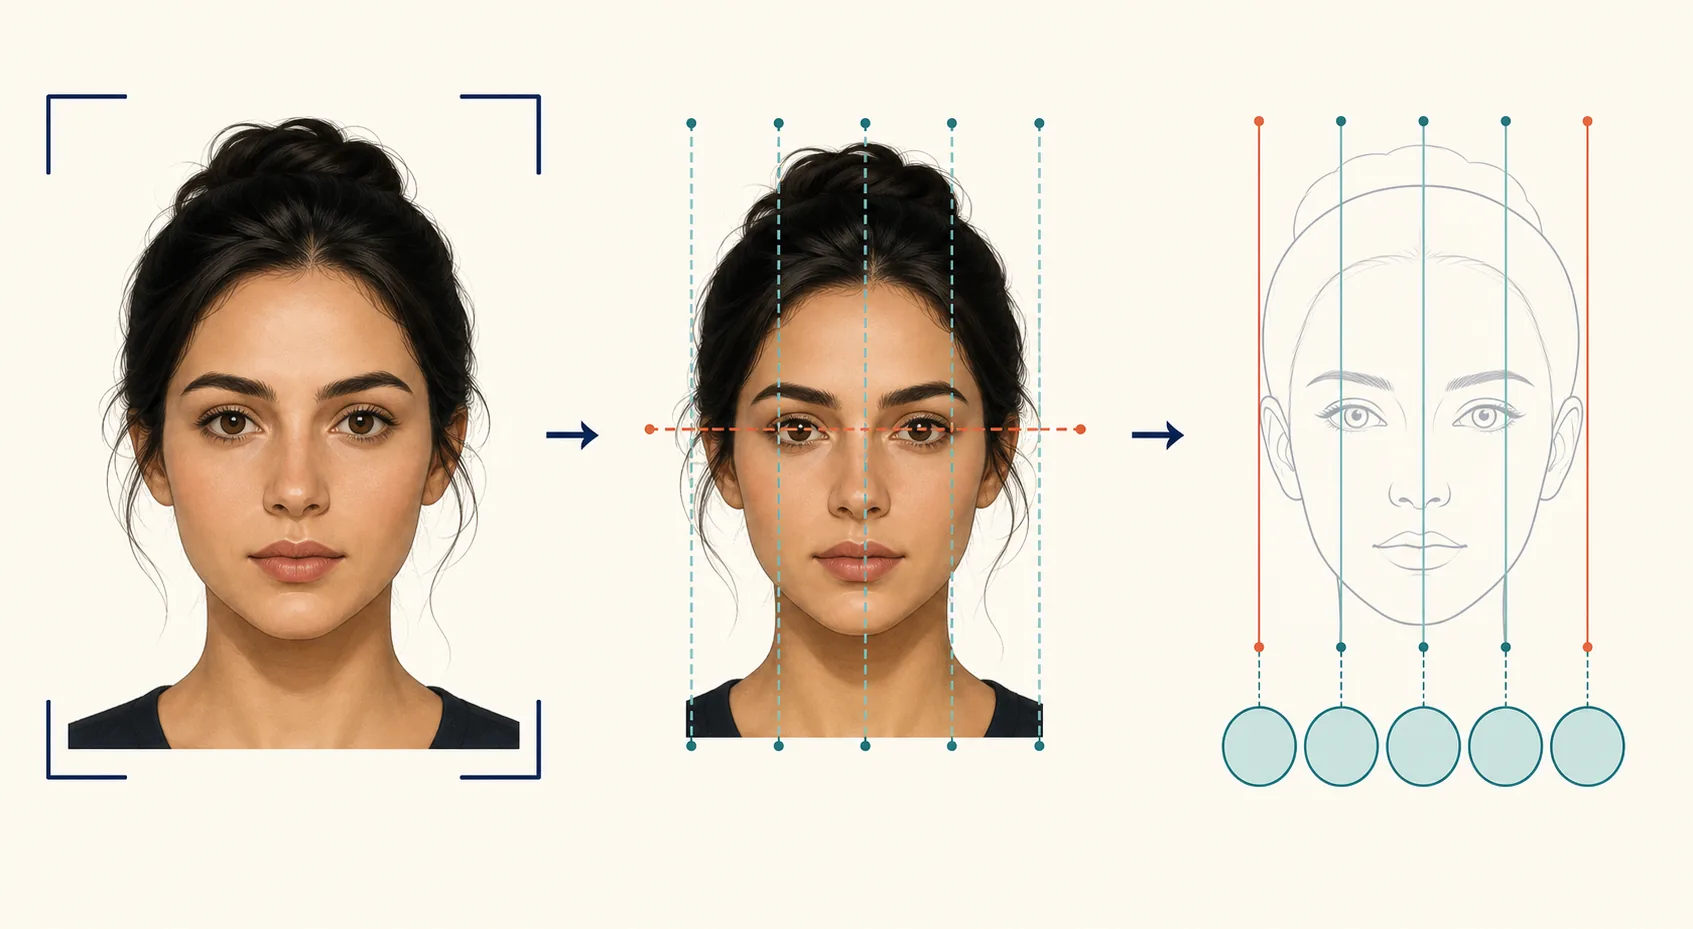
Start with the face contour
Use the visible left and right facial boundaries, not the outer edge of hair or a loose crop.
Mark the eye landmarks
Choose a consistent point such as the inner and outer eye corners or the center of each visible eye.
Add the center reference
Check the gap between the eyes and the position of the nose bridge relative to the two eye areas.
Compare, then repeat
Use another front-facing photo before deciding whether a difference belongs to the face or the camera.
How to Measure Facial Fifths From a Photo
You can calculate facial fifths with a transparent overlay, a drawing app, or an AI face-analysis tool that exposes its landmarks. The arithmetic is less important than keeping the reference points stable. If one image uses cheek width and another uses hair width, their ratios are not comparable.
For a manual check, draw a horizontal line through the eye region and mark the left and right facial boundaries. Then mark the eye corners or eye centers, estimate the central gap, and compare the five visible intervals. Record the image and the landmark convention so you can repeat the check later.
Manual measurement shortcut
If your guide lines move when you change the crop or landmark definition, the result is method-sensitive. Report the method instead of presenting one number as a permanent fact.
- Use a clear, front-facing photo with the camera near eye level.
- Keep the head level and relax the expression if eye spacing is the focus.
- Use the same contour and landmark rules for every photo in a comparison.
- Avoid hair, glasses frames, shadows, or a tight crop as substitutes for facial boundaries.
- Treat small differences as uncertain when the image is low-resolution or strongly compressed.
What to Compare: Eye Spacing, Eye Width, and Face Width
The phrase facial fifths is often used as shorthand for several related comparisons. Eye spacing is the distance between the eyes. Eye width is the width of an eye opening or a chosen eye landmark span. Face width is the visible distance between the outer facial boundaries. These are connected, but they are not interchangeable.
A photo can make one signal look unusual while the others stay stable. A wide-angle selfie may enlarge the nose and central face. A smile can narrow the visible eye openings. Hair or a crop can make the outer sections appear smaller. Look for the relationship among signals before choosing a label.
Eye spacing
Compare the central gap with the chosen eye landmarks. Keep gaze and expression consistent.
Eye width
Use the same corner or pupil convention on both sides. Do not confuse eyelid opening with the whole eye socket.
Face width
Measure the visible facial contour, not hair, earrings, glasses, or an uneven crop.
Central alignment
Check whether the nose bridge and face center sit between the two eye areas in the same image.
What “Ideal Facial Fifths” Really Means
Searches for ideal facial fifths often imply that one arrangement should fit every face. In practice, a reference layout is only a comparison convention. Faces vary in eye shape, orbital structure, cheek width, brow position, nose projection, and jaw contour, and those differences do not become defects because a grid is uneven.
A more useful question is whether the layout helps explain a particular photo. It may help with portrait drawing, glasses styling, camera framing, or understanding why an AI report describes the eyes as close-set or wide-set. It should not be used as a universal attractiveness score or a reason to pursue unsafe changes.
Interpretation boundary
“Ideal” is a subjective reference, not a medical standard. A facial fifths diagram cannot diagnose facial structure, dental alignment, health, age, identity, or personality.
Why Photo Angle and Lens Distance Change the Result
Camera distance is one of the biggest reasons facial fifths can look different from one image to another. A close phone selfie exaggerates the parts nearest the lens, often making the nose and central face look larger while changing the apparent relationship between the eyes and outer contour. A farther camera position usually produces a flatter, more stable perspective.
Head rotation, camera height, expression, lighting, and image processing add more variation. The effect is not that the face has changed; the projection has changed. For a fair comparison, take several portraits from a similar distance and compare the pattern rather than the most extreme frame.
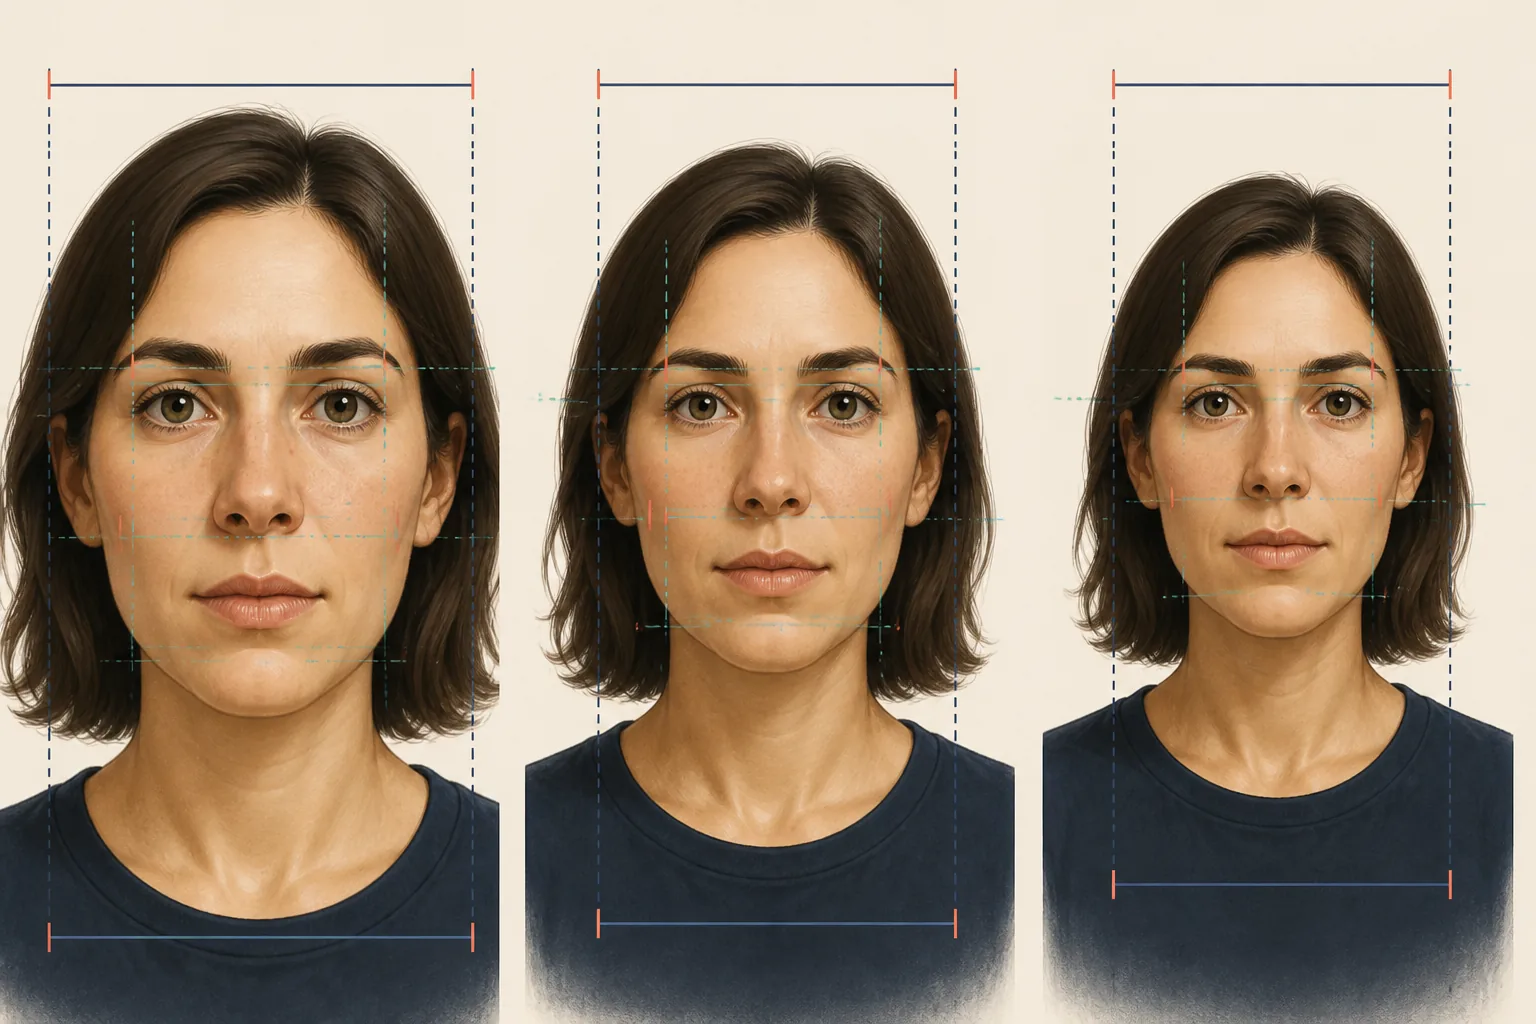
- Keep the camera at eye level and use a moderate distance rather than a very close selfie.
- Keep the face centered and avoid turning toward one side of the frame.
- Use even light so shadows do not create a false contour or eye-width difference.
- Compare a small set of similar portraits before drawing a conclusion.
How to Use a Facial Fifths Result Without Overreading It
A facial fifths result is most useful as a prompt for a better question. If the outer sections look wide, check whether the lens, crop, hairstyle, and face angle explain it. If the central gap looks narrow, compare the eye landmarks and expression before turning that observation into an identity label.
You can combine the result with facial thirds for vertical balance, symmetry for left-right alignment, and face shape for styling context. These signals answer different questions. Keeping them separate prevents a single photo-dependent observation from becoming a sweeping judgment.
A practical conclusion
The best facial fifths result explains what the camera shows and what it cannot show. It supports observation; it does not define the person in the photo.
- Use it to compare portraits, drawing references, framing, or eyewear proportions.
- Write down the photo conditions and landmark convention beside the result.
- Prefer a range or repeated pattern over a precise number from one image.
- Stop retesting when the process is increasing anxiety instead of improving understanding.
Facial Fifths FAQ
References and Further Reading
Compare Proportion Signals in a Live Tool
Use a clear portrait in FaceAnalysis.org if you want to compare proportion notes with symmetry, face shape, and photo-quality signals.